Picking up a dressage whip for the first time feels like holding a magic wand you haven't learned to use yet. It's full of potential, a little awkward, and waiting to be understood. Carrying a dressage whip isn't about dominance or discipline. It's about communication. A well-timed, well-placed touch can turn a sluggish response into a light, engaged stride. That moment of connection between horse and rider is worth chasing.
New to dressage? You might be figuring out how to hold your reins and whip together without losing control. More experienced rider? You may want to sharpen your aids before a competition. Either way, this guide covers everything you need to know. And just like mastering your aids, choosing reliable gear — whether from trusted equestrian suppliers or investing in well-fitted custom equestrian clothing — plays a quiet but important role in how confidently and comfortably you ride.
As your riding becomes more refined, many riders also begin paying closer attention to fit and function in what they wear — often turning to high-end custom equestrian clothing designed for precision, comfort, and discipline-specific performance.
What Is a Dressage Whip and How Does It Differ from Other Whips?

Here's something most beginners don't realize: not all riding whips are interchangeable. Using the wrong one is like trying to whisper with a megaphone.
A dressage whip is built for flatwork. It runs 90–140 cm long — lightweight and flexible. That length matters. You can give a gentle tap behind your leg without moving your hand or breaking rein contact. The cue stays quiet. The message stays clear.
For competition, FEI, BD, and USEF rules (2025–2026) cap dressage whip length at 120 cm for horses and 100 cm for ponies. At home, a 100–110 cm whip works best for most riders — long enough to reach, light enough to carry without strain.
Dressage Whip vs. Crop vs. Schooling Whip
Whip Type | Length | Best For |
|---|---|---|
Dressage Whip | 90–140 cm | Flatwork, leg reinforcement |
Jumping Crop | 40–80 cm | Shoulder taps, jumping |
Schooling Whip | 80–120 cm | Everyday hacking, general schooling |
Lunge Whip | 140–180 cm | Groundwork only |
A jumping crop is short and stiff. It's built for quick shoulder contact — not for the soft leg-aid cues dressage requires. A schooling whip falls in the middle. It's versatile, but shorter. Dressage riders lose the reach they need for lateral work and precise transitions.
New to dressage equipment? Start with a 100–110 cm whip for horses, or 40–100 cm for ponies. Touch your horse's side without moving your hand. The length is right if you can do that with ease.
How to Hold a Dressage Whip the Right Way While Riding
Most riders grip a dressage whip like they'd hold a flashlight in a dark room — tight, tense, a little desperate. That instinct makes sense. It's also what unravels everything else.
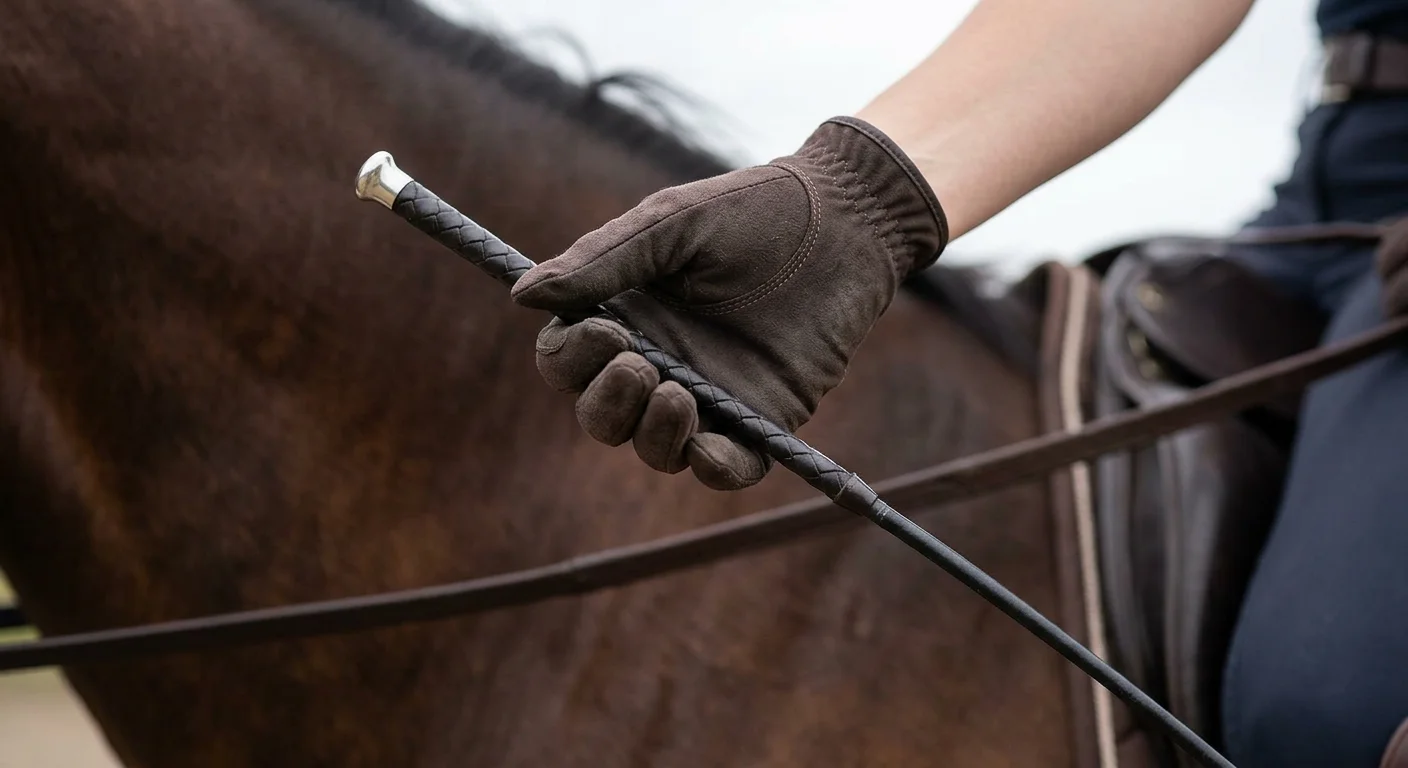
The grip is simple once you see the logic. Rest the whip in the center crease of your palm, running along the inside of your hand. Thumb and pinky stay relaxed — not rigid, not gripping. That softness is on purpose. It protects 1–2 inches of dynamic rein adjustment. Tighten your hand around the handle and that range is gone.
From there, let the whip angle down at 45 degrees, resting against your thigh. You get stability without restriction. On a tap, your hand doesn't move toward the horse. The whip bounces off your thigh first, then makes contact. It's a small mechanical detail. It keeps your rein contact clean and your aids quiet.
Your wrist stays flat and straight, palm lines aligned with the shaft. Your pinky does the real adjusting — close it for a firmer tap, open it for a soft tickle. Your elbow stays close to still. (A good practice trick: picture your elbow resting against a wall behind you.)
How to Hold Reins and Whip Together Without Losing Contact
This is where most beginners lose confidence. The good news: the whip should not change how your reins feel. Neutral hand position is the goal. Your wrist moves a few degrees on use. Rein length stays unchanged.
Carry the whip in your inside hand — it activates the inside hind leg. Switch hands at regular intervals, especially near walls or with sensitive horses. Transfer it clean, with no bump to the mouth. Practice both sides. Asymmetry in your hands shows up in your horse's movement long before you spot it yourself.
Riders working with teams, clubs, or even launching their own equestrian lines often collaborate with equestrian clothing manufacturers or a reliable equestrian clothing factory to ensure consistency in gear — because small details in equipment, just like in whip handling, make a visible difference over time.
For brands or professionals looking to scale, many of these partners also offer OEM/ODM services, allowing you to develop functional, discipline-specific riding wear that aligns with both performance needs and brand identity.
Quick Grip Check
Run one finger along the whip's shaft while holding it. A good grip keeps the whip balanced and level. It tips or wavers? You're holding too tight — or too loose at the wrong point.
Three grip mistakes worth memorizing:
A correct grip isn't about control. It's about staying available — hand open enough to respond, relaxed enough to communicate, steady enough to be trusted.
The Correct Aids Sequence: When Does the Whip Come In?
There's a sequence to this. Once you understand it, everything clicks.
Classical equestrian training splits aids into two categories: natural aids (seat, leg, hand, weight, voice) and artificial aids (whips, spurs, draw reins). The rule is simple and firm. Natural aids come first. Always. The whip is never a first response. It enters the picture only after the horse fails to answer the leg.
Here's the exact sequence:
That "at the same time" part is critical. Most riders miss this. Using the whip alone — without the leg — trains the horse to react to the whip, not the leg. You've skipped the entire point of dressage riding aids training.
Timing Is Everything: The Biomechanical Window
The whip must land at the exact moment the hind leg on the same side is ready to lift off the ground. That's the window. Use it during the weight-bearing phase — the leg is pushing down — and the horse can't respond the right way. That's not disobedience. That's confusion.
Reinforcement vs. Punishment — They Are Not the Same Thing
Reinforcement ✓ | Punishment ✗ | |
|---|---|---|
Trigger | Horse misses the leg aid | A mistake or bad behavior |
Timing | Hind leg lifting phase | Arbitrary |
Used with | Leg aid at the same time | Whip alone |
Intensity | Light tap | Hard strike |
Result | Horse learns the leg | Horse learns fear |
A whip used the right way is a clarifying signal — not a demand. It tells the horse: that leg aid was real, and it matters. Over time, with the right timing and a light touch, the whip becomes less and less needed. A horse trained through clarity, not force, gets to the point where a whisper is enough.
Step-by-Step: How to Use a Dressage Whip Behind Your Leg

The mechanics here are simpler than most riders expect — and more precise than most riders bother to try.
Here's what the movement looks like, broken into its real parts.
1. Keep Your Hand Where It Is
Your hand does not move. Not an inch back. Not a fraction upward. Not a breath away from rein contact.
Everything happens in your wrist — a small, contained flick. Your elbow stays quiet. Your upper arm stays still. The range of motion is about one inch. That's the whole thing.
This is what separates a clean aid from a confusing one. Your hand shifts, and you've sent two messages at once. Horses don't sort those out in your favor.
2. Use the Ricochet, Not the Strike
Here's the technique most instructors skip: tap your own thigh first, then let the whip bounce back to the horse's side. It sounds like a small detail. It changes everything.
That controlled bounce stops accidental contact. It also keeps the tap measured rather than sharp. The whip already rests at a natural 45-degree angle across your thigh. The ricochet is that angle doing its job.
3. Target the Right Spot at the Right Moment
Place the whip behind your leg, on the same side as the hind leg you want to engage. This links the whip aid to your leg aid in the horse's mind — one clear, connected group of signals.
Timing is where most riders lose the thread. The whip must land the moment that hind leg is about to lift off the ground — not while it's bearing weight, not mid-swing. In rising trot, that window opens as you come up out of the saddle on the correct diagonal.
Miss that window and the horse isn't being difficult. The horse flat-out cannot respond the way you're asking. That's physics, not attitude.
4. Follow the Aid Hierarchy, Every Time
Seat first
Leg second
Whip third — only if the leg goes unanswered
Use the whip at the same time as your leg on the same side. Never use it instead of your leg. A whip used alone trains the horse to watch for the whip. A whip used with the leg trains the horse to listen to the leg. Those produce two very different horses to ride.
One firm tap gets no response? The next tap can be a bit more definite — but the goal is never alarm. It's clarity.
5. Stop the Moment the Horse Responds
Your horse answers — stop. Release the pressure, soften the ask, let the moment land. That pause is the reward. It's how the horse learns what the right answer feels like.
Over time, this builds a horse that responds to a whisper. Not repetition. Not force. Just consistency, good timing, and the willingness to quit the moment the answer is yes.
How to Switch the Whip Between Hands Without Disrupting Your Ride
Switching the whip between hands is a small skill that separates a polished rider from a struggling one. Get it wrong and you pull on the reins, wobble the whip, and send your horse a signal you never meant to give. Get it right and nobody — not your instructor, not your judge, not your horse — even notices it happened.
Here's the five-step transfer that keeps everything clean:
Bring both hands toward the center of the neck — rein contact intact, no pulling.
Slide the whip downward with your thumb and fingers, keeping the tip pointing toward the ground.
Opposite hand takes the handle — grip it firm and precise, above or on the handle. Never grab the shaft. That's what causes the wobble.
Original hand releases and returns to its rein position.
Open hands back to correct width, settle the whip behind your new leg.
Build the Skill in Stages
Start at halt. No rhythm to manage, no momentum to protect — just the transfer itself, clean and unhurried. Aim for 10–20 repetitions before you ask anything more of yourself.
Walk comes next. The transfer stays steady, soft contact maintained throughout.
Move to trot after your walk switch hits a 90% success rate. That's the honest benchmark.
The Whip-Side Rule Worth Remembering
The whip always supports the inside leg. Right leg yield? Whip moves to the left hand. Left leg yield? Whip moves right. Make the switch before the movement begins — never mid-figure. Switching during a leg yield splits your attention at the worst possible moment.
The benchmark for a smooth switch: the whip settles behind the leg within two to three seconds. No rein disturbance. Movement almost invisible to your horse.
Common Mistakes When Using a Dressage Whip (and How to Fix Them)
Most riders don't misuse the dressage whip out of carelessness. It's habit. Small, invisible patterns build up over months of training. Then the horse stops listening — and no one can explain why.
Here are the mistakes worth knowing before they cost you.
Dressage Whip Rules in Competition: What You Need to Know
The rules here are unforgiving — and they vary more than most riders expect.
In pure dressage competition (FEI and British Dressage standard tests), whips are banned inside the arena. No warnings. No point deductions. You face instant elimination. Your score is voided and the test ends there. A judge will stop you at the entrance and may send an assistant to take the whip away. The rule is treated with zero tolerance.
The key length rule: 120 cm maximum for horses, 100 cm for ponies — lash included in the measurement. One whip only.
Where the Rules Differ
Discipline | Whip in Arena? | Exceptions |
|---|---|---|
FEI / BD Standard Tests | ❌ Prohibited | Freestyle to music, para dressage, some U18/disability categories |
Eventing Dressage Phase | ✅ Permitted | Not in USEF/USEA Championships |
Warm-up areas work differently. Whips are allowed in schooling rings and collecting rings. That said, FEI stewards keep a sharp eye on things. Excessive force, repeated strikes, or signs of horse distress can earn you a yellow card. Push it further, and you're out of the competition.
Check your whip, bit, noseband, and spurs before stepping into the arena at any level. A judge will inspect all of it. Come prepared.
Beginner's Guide: Building Confidence with a Dressage Whip
Most beginners tense up the moment someone hands them a dressage whip. That reaction makes sense. You're already managing reins, seat, legs, and breathing — adding one more tool feels like a lot.
Here's the truth: the whip doesn't need to come out much. Carrying it alone often makes your horse more responsive. You may never need to use it at all.
These foundations need to be solid before you introduce the whip:
Those basics have to be there first. The whip backs up an aid you've already given — it doesn't replace one.
For beginners, simpler is better. Go with a lightweight, mid-length whip (100–110 cm). Nothing fancy. Nothing that makes you nervous just holding it. A plain, easy-to-grip tool beats a high-end one that stiffens your hand.
Try this before your next ride: breathe with intention — four counts in, four counts hold, four counts out. Do ten rounds. Your horse reads your body before you even cue it. A calm nervous system signals calm, clear communication.
Let your instructor set the pace. A whip added too soon creates confusion. At the right stage, it fits into your riding and supports what you've worked to build — without drawing attention to itself.
Conclusion

Most beginners figure this out after months of frustration: the dressage whip is not a shortcut. It's a conversation. A quiet, precise extension of your leg aid. It asks your horse to listen with attention — not move out of fear.
Learning the correct aids sequence takes time. So does carrying a dressage whip without gripping or tensing your hand. But once a single light touch behind your leg gets a response, something shifts.
Your horse becomes more responsive. Your position stays cleaner. The whole ride feels less like negotiation and more like partnership.
Start small. Practice switching hands at the halt before trying it in trot. Check the competition rules before your next show. The next time your horse ignores your leg, reach for your whip with calm intention — not frustration.
That calm intention? That's where real dressage begins.


